Posted on

Cubase and Nuendo Now Supported

Steinberg’s Cubase Pro and Nuendo have supported up to third-order Ambisonics for a while now and I’m happy to finally add both DAWs to my Compatible Hosts list!

Most of the plugins already worked as Insert effects in Cubase and Nuendo Ambisonics tracks/buses. In the newest versions I have improved the integration of aXPanner and aXMonitor so that they can be loaded in the panner slot. This makes working with the aXPlugins in Cubase and Nuendo that little bit easier and more pleasant.

Now that these two plugins are fully compatible with Cubase/Nuendo Ambisonics tracks you can use the full aXPlugins chain from panning to playback in the most convenient possible way.

Adding aXPanner To A Track

You’ve recorded your session with a mixture of Ambisonic microphones and some mono or stereo spot mics. You want to convert the spot mics to Ambisonics to place them spatially in your scene. Doing this in Cubase and Nuendo with aXPanner is really easy:

  • Import your audio file to a mono/stereotrack.
  • Add a Group Track and set the Configuration to whatever Ambisonic order you are working with. Pick third-order Ambisonics for the best spatial resolution.
  • Click on Edit Channel Settings on your mono/stereo track. Change the Output to send to the Ambisonic Group Track that you made.
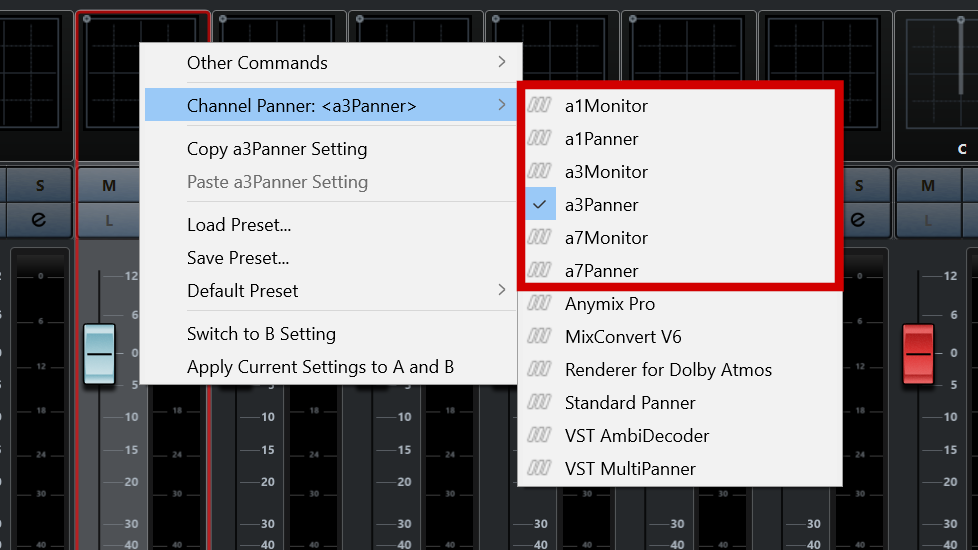
  • Now look at the Fader of the mono/stereo track and right-click on the Channel Panner area. A menu will open that has a list of all the compatible spatial panners. Select the aXPanner that supports the order of the Ambisonic Group Track. For example, if your Ambisonic Group Track is first-order then you can add the a1, a3 or a7Panner. If you selected third-order then you will need to use the a3 or a7Panner.
  • That’s it! Now you can open the plugin and start panning to perfection!
Channel Panner menu for Nuendo Ambisonics panner

But with Ambisonics, panning is only half of the setup. We can’t listen directly to the Ambisonically encoded tracks. We need to decode it. Thankfully, that’s even easier than setting up the panner.

Adding aXMonitor For Decoding

Now that you have your Ambisonic tracks (recorded or encoded/panned) you’re going to want to listen to them. The aXMonitor is here just for that.

  • Click on Edit Channel Settings on your Ambisonic trakc. Change the Output to send to the stereo output of your audio interface.
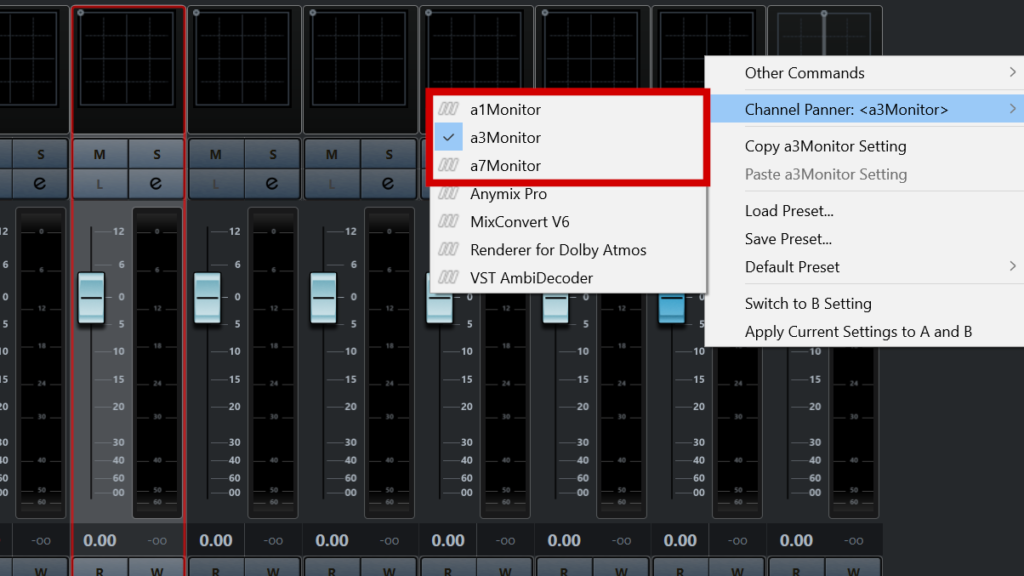
  • On your Ambisonic track go to the Fader. Right click on the Channel Panner area of the plugin. As with the aXPanner you will see a list of possible plugins to add – including the aXMonitor!
  • Select the aXMonitor that supports the ambisonic order of the track. For example, if your track is first-order then the a1, a3 and a7Monitor will all be able to decode the signal. If you are using a second- or third-order track then you will need to use the a3 or a7Monitor.
  • That’s it! Now you can load you favourite/personalised SOFA file and listen in binaural!
Channel Panner menu for Nuendo Ambisonics decoder

A word about the processing order

The a1 and a3 versions of all plugins will work as intended in Cubase/Nuendo – you’ll get (up to) first and third-order processing respectively. All you need to do is add them to the tracks, as above.

The a7 versions of the plugins allow up to seventh-order processing but only if the DAW allows it. For the moment Cubase and Nuendo Ambisonics tracks are limited to a maximum of third-order (16 channels per track). The good news is that the VST3 format is run by Steinberg and it recently added native support for seventh-order Ambisonics! That means that hopefully in the near future we’ll see this work its way through to Cubase and Nuendo.

So, if you are a Cubase or Nuendo user you can add the aXPlugin suite to your tools for mixing Ambisonics and know that you’re getting a tight integration with your DAW. I would love to hear what you do with them, so please get in touch!

Posted on

Plugin Updates and New Plugin (Beta)

All of the plugins in aXPlugins suite have been updated with new features, stability, and bug fixes. Here is a summary of the biggest or most interesting changes.

  • All plugins – All plugins can now have their license deactivated so you can move it to another computer. Simply hit the “SSA” logo at the bottom of the GUI and click to deactivate the plugin. If you are using Offline activation you will need to connect to the internet in order to deactivate your plugin.
  • All plugins – the number of activations available per license has increased to 5. One license still covers only a single user.
  • All plugins – the plugins are now installed using installers so you no longer have to copy the files to the plugin folders. All plugins are now automatically installed in the recommended system folders depending on their type (AAX/AU/VST3) and the operating system (Win/Mac).
  • All plugins – the Mac .pkg installers are now Notarized by Apple meaning the plugins should install without any warnings from Gatekeeper on Catalina (macOS 10.15). Please get in touch if you have any issues.
  • aXRotate – Yaw, pitch and roll can now be received via OSC messages. Select your desired port number (double click to enter) and click Connect. Click Show More to see the message format expected by the plugin as well as the incoming messages to your selected port.
  • aXDeesser – Some bug fixes.
  • aXEqualizer – Fixed a bug where changing a filter band at low frequency could cause the plugin to become unstable. Fixed another bug where loading a preset from the DAW would cause the UI markers to become unlinked from the audio.

To get the updated version of your plugin just head over to the Downloads section of your account page.

Please note: Because the updates now use installers, you should manually remove any previous versions of the plugins from you DAW plugin path, especially if you have used custom paths in the past.

New Plugin Beta Release

If you have bought one of the plugin bundles then you will find a beta version of a new plugin with the download from your account – aXLimiter! As the name suggests, this is an Ambisonic limiter with input gain, ceiling, look-ahead and release time (with option for auto).

Anyone who has bought a bundle will get aXLimiter for free when it is officially released.

The display shows the peak across all Ambisonic channels for the output (blue) and the input with gain applied (red). The amount of gain reduction over time is shown in white and in the meter to the bottom right.

I would be very happy to hear your thoughts and experiences using it, especially if you run in to any bugs.

Posted on

New Plugin: aXDeesser

Today I am happy to announce a new plugin: aXDeesser. As the name suggests, it is a de-esser made specifically to be used on Ambisonic signals. It is available in VST3 format (Windows and Mac), AAX (Windows and Mac) for Pro Tools | Ultimate, and AudioUnit (Mac).

As with the other plugins in the aX range, the aXDeesser is available in first-order, third-order and seventh-order variations. You can pick the one that fits your needs. The introductory price is 50% of the standard price. It costs 10€ for first-order, 20€ for third-order and 40€ for seventh-order (excluding VAT/sales tax).

You can also get the aXDeesser in the aXBundles. If you have bought any of the bundles in the past then you can head over to the downloads section of your account to get it for free! Just download the latest bundle and you will find the aXDeesser with your other plugins.

Why an Ambisonic De-esser?

Processing Ambisonic signals has to be done carefully to avoid changing or destroying the spatial properties of the sound field, so you need a de-esser that is designed with this in mind.

The aXDeesser also takes advantage of the spatial information provided by Ambisonics to allow you to focus on specific regions of your sound field in order to trigger the de-esser processing, giving you even more control over your processing. Effectively, you use the virtual microphone as a side-chain signal to activate the de-essing processing on the full signal.

Who needs an Ambisonic de-esser?

You can use the aXDeesser on any Ambisonics stream, but it is most useful if you are processing signals recorded with Ambisonic microphones. Anyone working on complete mixes where access to mono-encoded sources are no longer available will also find it useful.

If you have a recording made with a first-order microphone, such as the TetraMic or Sennheiser AMBEO VR mic, then the a1Deesser will fit your needs. The a3Deesser will allow you to de-ess recordings from the OctoMic or Zylia microphone. The a7Deesser is overkill for recordings made with an Ambisonic microphone, but can be used on full mixed scenes or if used creatively.

So, if you have a recording made with an Ambisonic microphone then the aXDeesser is the perfect tool for de-essing. You can tame excessive sibilance, at the same time preserving spatial fidelity.

How does it work?

The plugin has two modules – a virtual microphone and the main de-esser module. The virtual microphone captures a signal that is used to feed the de-esser’s detection algorithm. When the microphone signals activates the de-esser, the processing is applied to the whole sound field.

You can control the direction of the virtual microphone, along with the focus. The focus essentially controls how directive the microphone is, with the maximum directivity depending on the Ambisonic order of the signal received by the plugin. The incoming signal order is shown in the bottom left of the plugin GUI. A focus of 0% gives an omnidirectional microphone response. Focus of 100% gives a cardioid response for a first-order signal and the beam narrows as the input order gets higher. The meter on the left of the GUI shows the level of the virtual microphone signal.

The de-esser has all of the usual controls you would expect to find. You can set the frequency, the bandwidth, level, compression ratio and attack and release times. The meter on the right of the GUI shows the gain reduction being applied to the sibilance band.

Interested?

Does all of that sound like something that could be useful to you? If so, head over to the shop by clicking below. By buying from this website you will be helping support independent development of spatial audio tools. Thanks for your support!

Posted on

New Prices and Plugin Updates

It has been a while but now I have plenty of news to share!

New Prices

First up (as you probably saw in the big image at the top!), if you head over to the shop, you will see that all of the plugins have new, lower prices. I think you’ll find them quite attractive. By buying a plugin you will be supporting the independent development of spatial audio tools. The more interest there is in the plugins, the more time I can spend making improvements, adding new features and developing new plugins.

Offline Activation

All plugins can now be used offline. You just need to be connected to the internet the first time you activate the plugin. Then, from that point on you should not need an internet connection to use the plugin. Easy! A lot of users requested this, so I am really glad to be able to release it.

You can finally work with your spatial audio projects on the plane!

Plugin Updates

I am always working to try improve the plugins in any way I can. Here are a few of the improvements:

  • VST to VST3 – The plugins are now available for VST3 instead of VST. VST3 is now the only format supported by Steinberg, so I wanted to make the move early. After polling users, it appears that most are using the VST3-supporting Reaper as their main spatial audio DAW. The VST3 plugins should automatically replace the VST versions in old projects but I cannot guarantee this, so you should not delete the older versions of the plugins that you might need.
  • aXEqualizer
    • improvements to the filter algorithm for less CPU use.
    • GUI now displays the pre- and post-EQ spectrum.
  • Performance improvements – I have added small performance improvements to most of the plugins. This is an ongoing project so I hope to be able to speed things up even more in the future.
  • GUI – All plugins have had the way they display the measurement units updated. These are now included alongside the parameter value, rather than in the label.

Coming Up…

I have a few new plugins coming up of various complexities. One is quite simple and the others are more ambitious and exciting. The simple plugin will be out sooner rather than later. The other will require some beta testing. If getting your hands on some plugins early is something you are interested in, get in touch in the comment section or send me an email.