I’m really happy to announce another update of the aX Plugins. There are some bigger and smaller updates to all plugins. These updates add new features, make the plugins faster and easier to use and refresh the interface.
You can download the updated versions from your account.
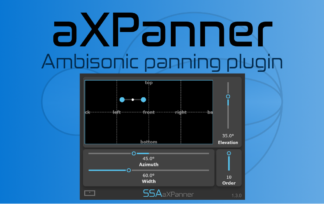
aXPanner – New Feature!
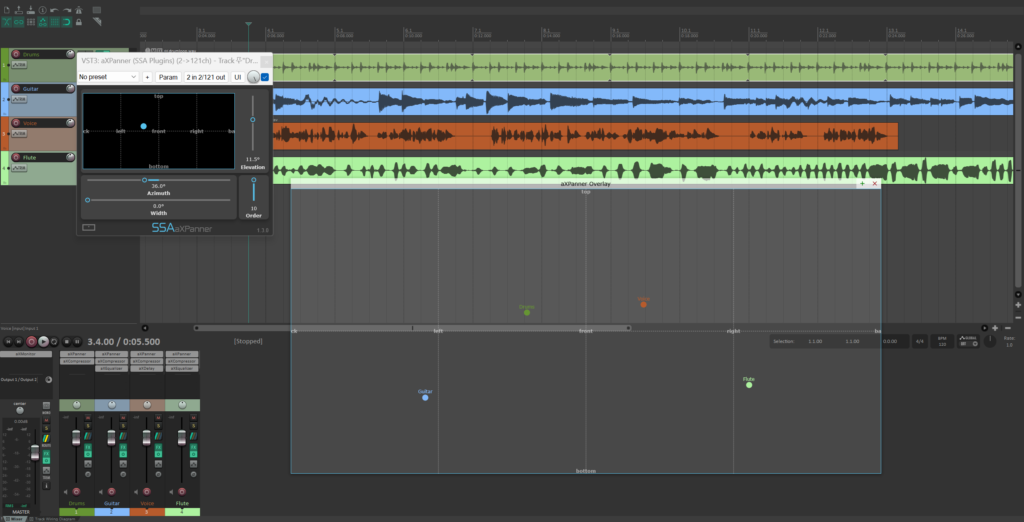
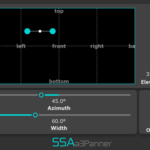
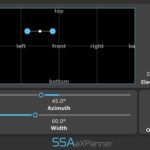
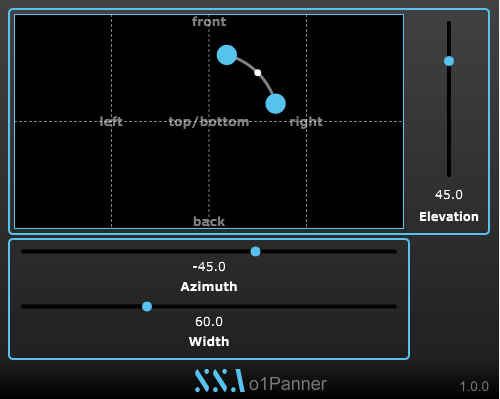
Following user requests, aXPanner now has a new resizable pop-out window that you can use to overlay on 360 videos or images. It also gathers all instances of the plugin in one place so you can get an overview of where all the other tracks in the project have been panned.
Each marker displays the name of the plugin’s track, so you always know what you’re working on. It also takes the colour your set the track in your DAW and uses that for the marker to make things even clearer and more convenient. You can also manually select the marker colour yourself, for extra customisation.
A screenshot of aXPanner with the new pop-out window open. The azimuth and elevation of all four tracks in the project can be controlled from one window.
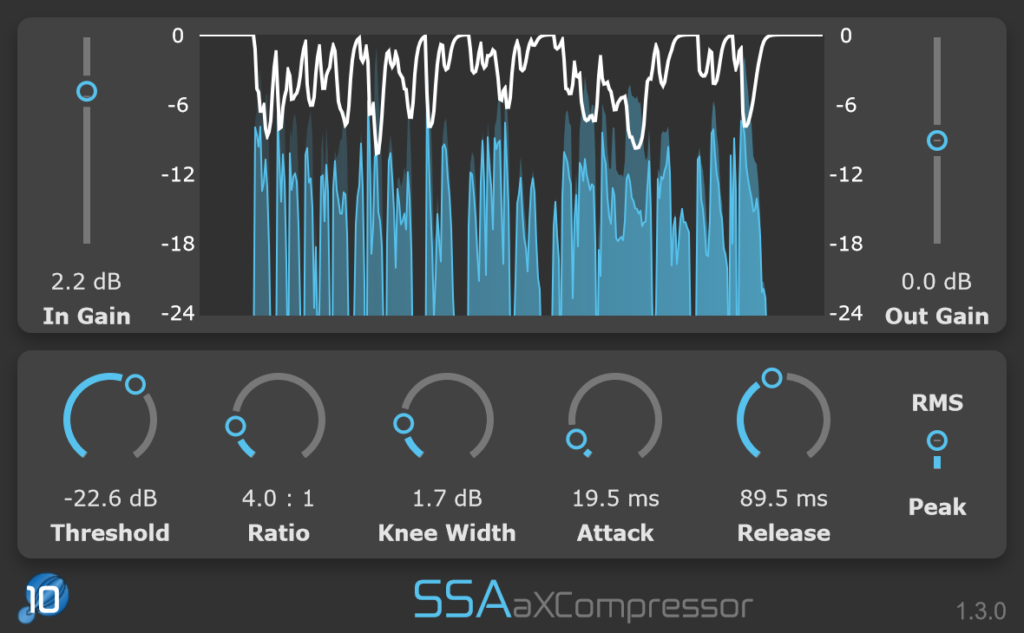
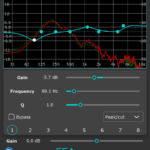
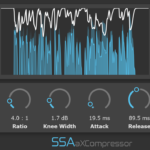
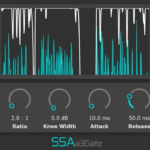
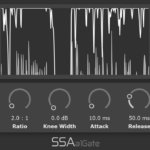
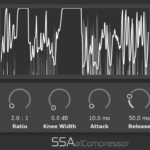
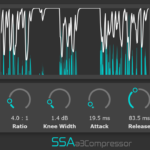
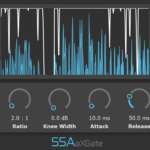
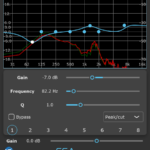
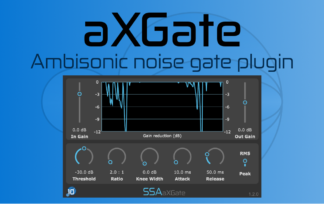
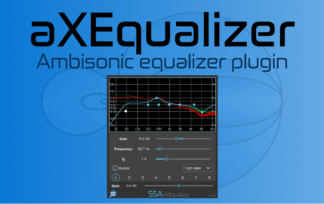
aXCompressor and aXGate – Better Visualisation
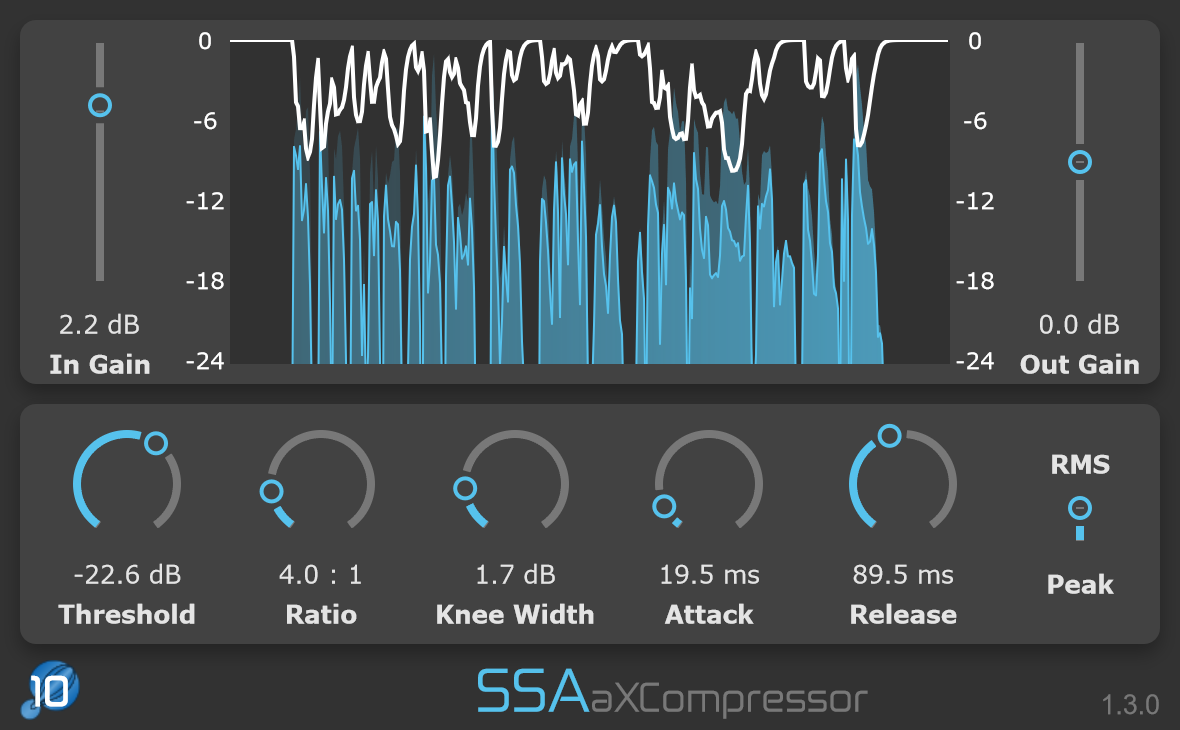
aXCompressor and aXGate now have new gain-reduction meters. As well as just looking a bit nicer, they now show the input and output levels of the signals so you can get a really clear idea of just how much gain reduction you’re applying.
All Plugins – Pro Tools Automation Shortcut
This was another user requested feature and is a quality-of-life improvement for Pro Tools users: All plugins now support the Ctrl+Win+Click (Windows) and Ctrl+Cmd+Click (Mac) shortcut to open the automation lane automatically.
To use it you have to do one of two things:
Enable each parameter individually using the following shortcuts while clicking the parameter you want to automate: Ctrl+Win+Alt+Click (Windows) or Ctrl+Cmd+Alt+Click. This brings up a pop-up that lets you enable the parameter. Now you can bring up the automation lane using Ctrl+Win+Click (Windows) or Ctrl+Cmd+Click (Mac)
(Preferred) Enable “Plug-in Control Default to Auto-Enabled” in Preferences > Mixing in Pro Tools. Any new plugins you insert will have automation controls already enabled.
All Plugins – GUI Refresh
All of the plugins have had a light GUI refresh to make them a little sleeker and more modern looking. It’s subtle but I think makes a big improvement. Can you spot the changes?
What Do You Want To See?
Do you have any features you’d like to see in a future version of the plugins? Some small thing that would make your life easier? A cool feature that would make working with them even more fun? If so, get in touch with me and I’ll do my best to make sure it happens!
It has been six years since I released the first version of the a7, a3 and a1 plugin suites, for (up-to) seventh-, third- and first-order processing respectively. The time has absolutely flown by. I’d like to thank everyone who has used my plugins, shared their amazing creative projects with me, and provided feedback that continues to make the plugins better. There is plenty more to come in the future!
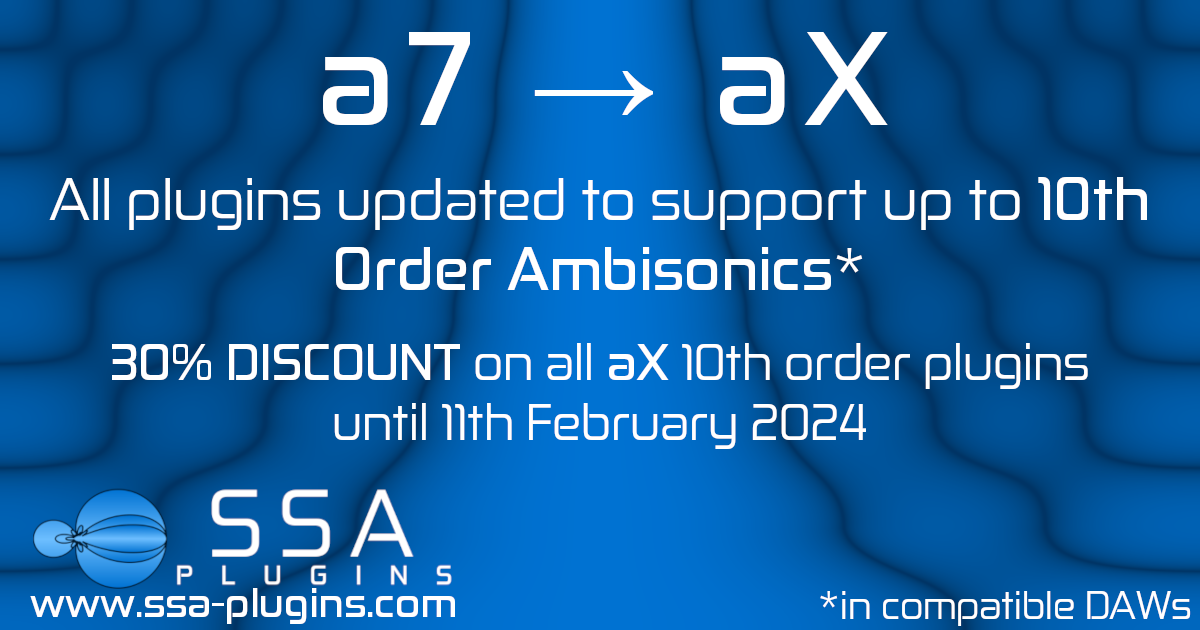
Today, however, I am happy to announce another big update, as the a7 suite evolves to become the aX suite.
aX isn’t just a new name. The new update of aX plugins are able to process up-to tenth-order Ambisonics! Going forward, I aim to have the aX version of the plugins support the highest order in each DAW for maximum spatial resolution.
As a re-introduction bonus, the aX tenth-order version of the plugins is on sale with a 30% discount until 11th February 2024!
Tenth-order is a lot. Why go above seventh-order?
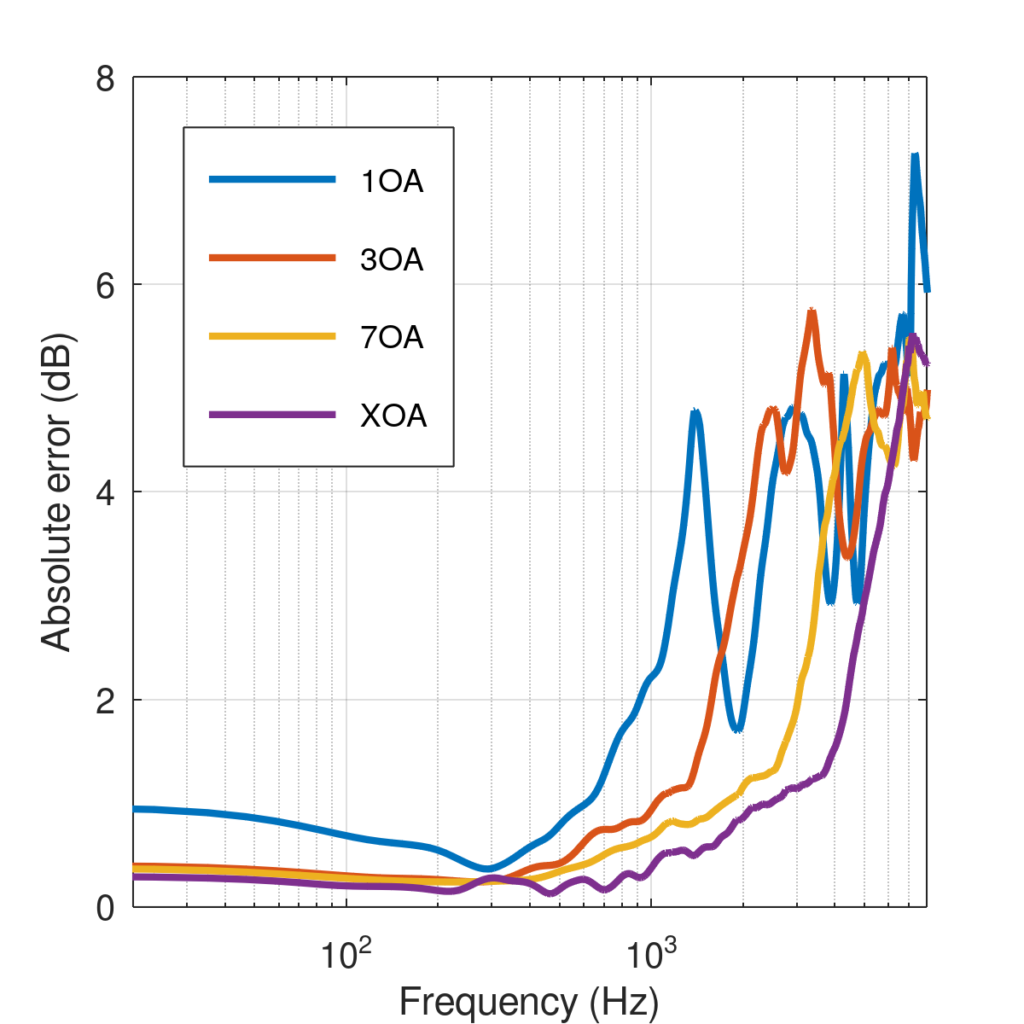
The amount of error in binaural decoders of different orders as a function of frequency. Tenth-order has the lowest error across more of the spectrum.
In many cases seventh-order will be enough. Often, even third-order could be enough. It all depends on your signal flow and maybe the final order you are targeting (though I’d argue it’s always best to work with the highest order possible).
The main benefit of tenth-order processing is for binaural processing or for very large loudspeaker layouts. For some Ambisonics-to-loudspeaker decoders higher orders can also be beneficial when working with smaller irregular layouts. That’s something I hope to come back to in a later post.
However, most people can’t fit a giant loudspeaker layout (or even 7.1.4) in their living room that leaves binaural as a way to experience immersive audio. How we perceive binaural decoding depends mainly on three things: the HRTF we are using, the order of the ambisonic signal, and the method used to create the decoding filters. Let’s focus on the impact of the order to see what going up to tenth-order gets us.
The graph shows the amount of error in the binaurally decoded signal as a function of frequency. For the first-order (1OA) decoder the error starts to rise even below 1000 Hz. Third-order gets us above 1000 Hz and you can usually hear a huge difference by going from 1OA to 3OA. For tenth-order, the error doesn’t rise significantly until nearly 4000 Hz. This means that if you are using a custom .SOFA HRTF in aXMonitorthen you are going to get holophonic scene reproduction over even more of the spectrum.
That’s a great reason to use the maximum order possible when listening binaurally!
How can I work with tenth-order Ambisonics?
The recent Reaper 7 update expanded the number of channels-per-track to a whopping 128. Tenth-order Ambisonics needs 121 channels, as opposed to seventh-order which needs 64. All you need to do is load the plugins on a track and set the number of channels to at least 121. It’s exactly the same process you would have used for seventh-order. Other than that, using the aX plugins hasn’t changed.
I work with Pro Tools/Cubase/Nuendo (any DAW except Reaper). Can I use tenth-order?
No, unfortunately not. Even though the aX plugins support tenth-order internally, the DAW they loaded in has to have enough channels-per-track to support it. Pro Tools Ultimate has seventh-order ambisonic buses so you can continue to use the new aX suite just like you did the a7 suite.
I bought the a7 suite. Do I have to pay for the new aX versions?
No! The a7 plugins have evolved into the aX plugins, they are not a completely new product. It means that once you update your plugins you will have access to tenth-order ambisonic processing when using Reaper 7.
I bought the a1/a3 suite and would like to upgrade to the aX suite. Do I have to pay full price?
No! If you have already bought any of the a1 or a3 plugins or bundles then you can benefit from the upgrade policy. Just get in touch and I will send you a discount code that removes the cost of the product you have already bought from the purchase of the equivalent aX plugin/bundle.
I don’t need tenth-order… Lower orders are enough for me.
Absolutely! There are plenty of cases where lower order processing is more than enough. If you’re recording with an ambisonic microphone, for example, then you are limited to the order of your microphone. Don’t worry, the a1 and a3 suites are still available at a lower price than the aX plugins.
From panning-to-playback for first-order Ambisonics
Steinberg’s Cubase Pro and Nuendo have supported up to third-order Ambisonics for a while now and I’m happy to finally add both DAWs to my Compatible Hosts list!
Most of the plugins already worked as Insert effects in Cubase and Nuendo Ambisonics tracks/buses. In the newest versions I have improved the integration of aXPanner and aXMonitor so that they can be loaded in the panner slot. This makes working with the aXPlugins in Cubase and Nuendo that little bit easier and more pleasant.
Now that these two plugins are fully compatible with Cubase/Nuendo Ambisonics tracks you can use the full aXPlugins chain from panning to playback in the most convenient possible way.
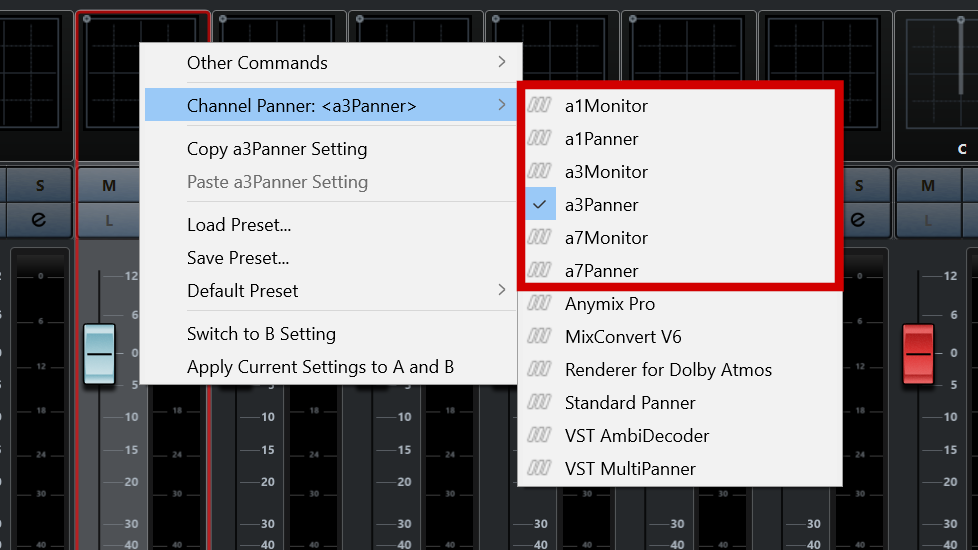
Adding aXPanner To A Track
You’ve recorded your session with a mixture of Ambisonic microphones and some mono or stereo spot mics. You want to convert the spot mics to Ambisonics to place them spatially in your scene. Doing this in Cubase and Nuendo with aXPanner is really easy:
Import your audio file to a mono/stereotrack.
Add a Group Track and set the Configuration to whatever Ambisonic order you are working with. Pick third-order Ambisonics for the best spatial resolution.
Click on Edit Channel Settings on your mono/stereo track. Change the Output to send to the Ambisonic Group Track that you made.
Now look at the Fader of the mono/stereo track and right-click on the Channel Panner area. A menu will open that has a list of all the compatible spatial panners. Select the aXPanner that supports the order of the Ambisonic Group Track. For example, if your Ambisonic Group Track is first-order then you can add the a1, a3 or a7Panner. If you selected third-order then you will need to use the a3 or a7Panner.
That’s it! Now you can open the plugin and start panning to perfection!
But with Ambisonics, panning is only half of the setup. We can’t listen directly to the Ambisonically encoded tracks. We need to decode it. Thankfully, that’s even easier than setting up the panner.
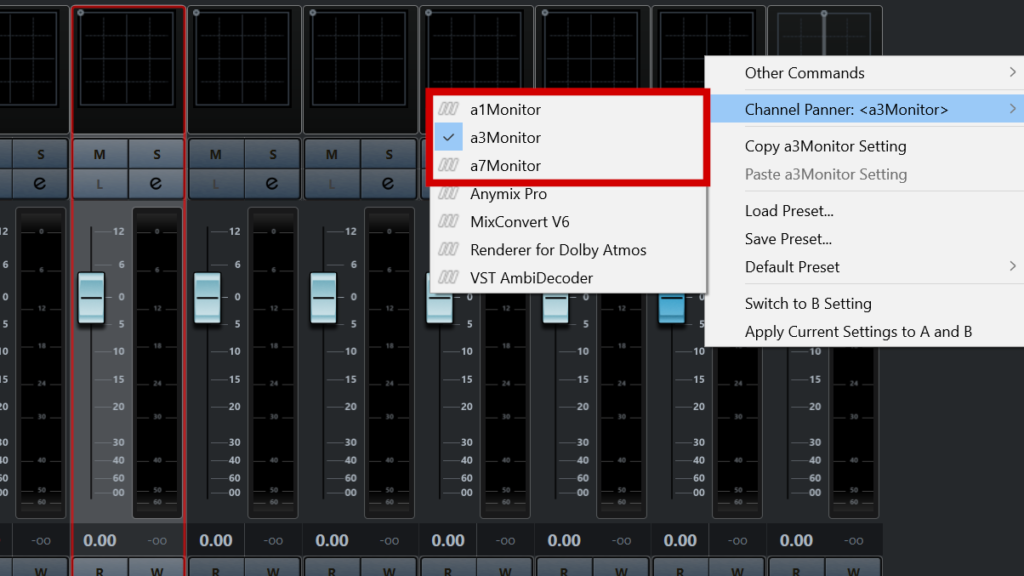
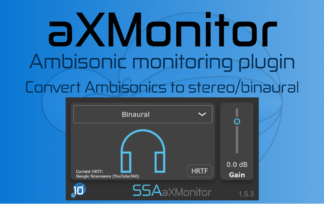
Adding aXMonitor For Decoding
Now that you have your Ambisonic tracks (recorded or encoded/panned) you’re going to want to listen to them. The aXMonitor is here just for that.
Click on Edit Channel Settings on your Ambisonic trakc. Change the Output to send to the stereo output of your audio interface.
On your Ambisonic track go to the Fader. Right click on the Channel Panner area of the plugin. As with the aXPanner you will see a list of possible plugins to add – including the aXMonitor!
Select the aXMonitor that supports the ambisonic order of the track. For example, if your track is first-order then the a1, a3 and a7Monitor will all be able to decode the signal. If you are using a second- or third-order track then you will need to use the a3 or a7Monitor.
That’s it! Now you can load you favourite/personalised SOFA file and listen in binaural!
A word about the processing order
The a1 and a3 versions of all plugins will work as intended in Cubase/Nuendo – you’ll get (up to) first and third-order processing respectively. All you need to do is add them to the tracks, as above.
The a7 versions of the plugins allow up to seventh-order processing but only if the DAW allows it. For the moment Cubase and Nuendo Ambisonics tracks are limited to a maximum of third-order (16 channels per track). The good news is that the VST3 format is run by Steinberg and it recently added native support for seventh-order Ambisonics! That means that hopefully in the near future we’ll see this work its way through to Cubase and Nuendo.
So, if you are a Cubase or Nuendo user you can add the aXPlugin suite to your tools for mixing Ambisonics and know that you’re getting a tight integration with your DAW. I would love to hear what you do with them, so please get in touch!
Pro Tools 2023.3 provides native support for Apple Silicon which looks like it provides some seriously impressive performance improvements. I am also happy to announce that all of the aXPlugins now also run natively on Apple Silicon. If you are an existing customer you can download the updates from the Downloads section of your account.
The plugins have been compiled as Universal Binary 2. That means that you can now run aXPlugins on your M1 or M2 Mac. Or if you use an Intel Mac you’ll still be able to use the most up-to-date version. So whether you’re using Intel or Silicon, Reaper or Pro Tools, for your spatial audio you can get the best performance for your machine.
As an additional update, I have been working on some major updates to the whole set of plugins. Those updates are taking a while but will be worth the wait. However, I am planning some smaller updates to the plugins in the near future. Keep an eye out for them in the weeks and months to come!
I spend most of my time working on my plugins or developing new tools for clients to use in their projects and products. But sometimes I have the chance to be involved in fundamental research.
A paper I co-authored with Brian Katz (Sorbonne Université, Paris) and Lorenzo Picinali (Imperial College London) was published earlier this year in Scientific Reports by Nature. If you want to read the paper, head over here – it’s Open Access so you can read it for free!
The title is: Auditory Accommodation to Poorly Matched Non-Individual Spectral Localization Cues Through Active Learning.
The paper looked at how well people can adapt to an HRTF over time with training. We then looked to see if, over time and without training, they would retain the localisation abilities they had gained. The “twist” was that we gave subjects an HRTF that was initially badly rated for them. We did this in order to investigate the worst-case scenario for content distributed without HRTF choice.
Studies like this are important for spatial and immersive audio because it still seems like it will be a while before consumers can have customised HRTFs. This means there will always be some people listening through an HRTF that is not well suited to them. If we can find ways to adapt users to these HRTFs then we can go some of the way to alleviating this problem.
Reference
Stitt, P., Picinali, L., & Katz, B. F. (2019). Auditory Accommodation to Poorly Matched Non-Individual Spectral Localization Cues Through Active Learning. Scientific reports, 9(1), 1063.
Abstract
This study examines the effect of adaptation to non-ideal auditory localization cues represented by the Head-Related Transfer Function (HRTF) and the retention of training for up to three months after the last session. Continuing from a previous study on rapid non-individual HRTF learning, subjects using non-individual HRTFs were tested alongside control subjects using their own measured HRTFs. Perceptually worst-rated non-individual HRTFs were chosen to represent the worst-case scenario in practice and to allow for maximum potential for improvement. The methodology consisted of a training game and a localization test to evaluate performance carried out over 10 sessions. Sessions 1–4 occurred at 1 week intervals, performed by all subjects. During initial sessions, subjects showed improvement in localization performance for polar error. Following this, half of the subjects stopped the training game element, continuing with only the localization task. The group that continued to train showed improvement, with 3 of 8 subjects achieving group mean polar errors comparable to the control group. The majority of the group that stopped the training game retained their performance attained at the end of session 4. In general, adaptation was found to be quite subject dependent, highlighting the limits of HRTF adaptation in the case of poor HRTF matches. No identifier to predict learning ability was observed.
Ambisonics is a wonderful format for 3D sound/spatial audio for many reasons: it is flexible, interactive, future-proof, and realistic. Despite being around since the 1970s, it is still very new to a lot of people and, like every technique, it has a bit of a learning curve. Here are 5 things every beginner should know about Ambisonics before getting started.
1 – You can’t listen directly to Ambisonic signals
If you work with traditional surround formats (5.1, 7.1 etc.) then you’re used to sending the sound where you want it. Dialogue to come from the screen? Centre channel. Sound effects and ambiences? Rear channels. You get the drift.
Ambisonics is totally different. You take your mono or stereo sound and pass it through an encoder, such as the aXPanner, and you get B-format signals out the other side. Unlike traditional surround, you cannot pass these signals directly to your speakers and listen to them. If you do, you’ll not get anything that sounds particularly spatialised.
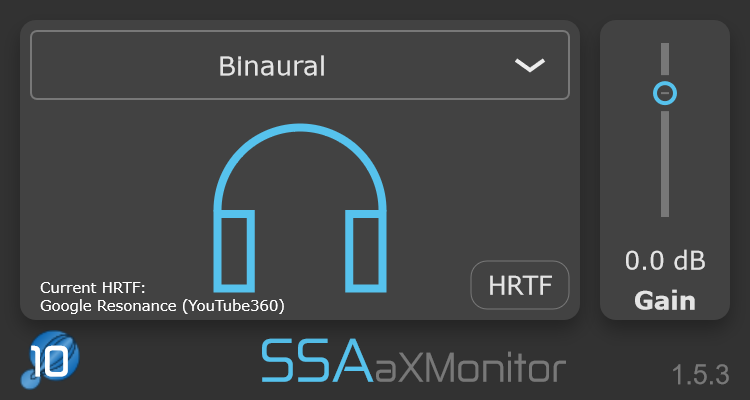
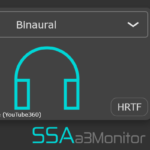
Instead, you’ll need a decoder that takes into account your loudspeaker positions and converts your B-format signals to loudspeaker signals. Or you can convert it binaural 3D audio for headphone listening. The aXMonitor plugin will do this for you.
2 – Ambisonics gets better with order
As soon as you start reading about Ambisonics you will quickly come across phrases like first-order, third-order, higher order. But what exactly does this mean? Without going into the deep maths of it, the order is a measure of how much spatial detail is in your sound scene.
Zeroth-order is the same as an omni-directional recording – all of the sound is capture but none of the directional qualities. First-order adds in x, y and z directions so we can now move the sound around. Higher orders use more complex mathematical functions. This increases the spatial resolution so it’s easier to discriminate the directions of multiple source when you are listening. If you would like to read in this about more detail you can check out one of my earlier posts.
Essentially, the higher the order you are able to use, the better the spatial quality of your work will be. The trade-off is that higher order require more audio channels to carry the spatial information. This needs more CPU. At first-order we need 4 channels, third-order it’s 16 channels and seventh-order it’s 64 channels!
Personally, I will always work in seventh-order to keep my work future-proof so I can archive in the highest possible quality. It’s trivial to convert from seventh- to first-order by dropping some channels. However, going the other way requires you to change settings or plugins throughout your projects(s). Better to do it right the first time!
3 – The channel sequencing matters!
Your Ambisonic panner will output the signals in a specific sequence. The decoder that you use will expect them to arrive in a particular sequence. If these don’t match, the final rendering will not have the intended spatial qualities. It should be easy to work without this becoming a problem, yes?
Unfortunately, no. There are quite a few Ambisonics conventions floating around and if you are using tools from different manufacturers you need to be sure they are all working with the same sequencing format. Channel sequencing can cause headaches even for the most experienced Ambisonics users.
These different conventions have tended to arise from mathematical formulations or practical considerations during Ambisonics’ time in the wilderness. The two best known these days are FuMa (short for Furse-Malham) an AmbiX (short for Ambisonic eXchange). For first-order signals FuMa uses the channel sequence W-X-Y-Z, while AmbiX uses W-Y-Z-X. This really isn’t something you can neglect.
Thankfully, the industry seems to have largely settled on the AmbiX convention for most purposes. This means you’re less likely to run into any confusion, but it can still happen – some tools, like Sennheiser’s AMBEO microphone A-to-B plugin, give the choice of FuMa and AmbiX. Just make sure you set it to the format expect by your decoder. The aX Ambisonic plugins all use AmbiX format specifically to avoid the confusion of different formats.
4 – The level relationship matters, too
This one is related to the last point. Different conventions set the levels differently between different Ambisonic channels groups. For example, the omni W channel is 3 dB weaker in FuMa than AmbiX format, while their first-order (x, y, and z) channels match in level (but, remember, not in sequencing!).
Generally, if you get your channel order correct, the level relationships will follow. You just have to careful that you do not change the level of one channel without doing exactly the same to all of the others. Doing so will mess with the spatial qualities of your sound scene. This also applies for frequency-dependent level changes, like EQ.
5 – Ambisonics is very sensitive to phase changes
If you’re processing your B-format Ambisonics then you had better be careful you’re using the right tools. Anything you do to one channel has to be repeated exactly on all the others because even a small phase change in only one channel can ruin the spatialisation of your work.
I’ve prepared a short audio demonstration of this with a sample of pink noise. The noise is panned to the left using first-order Ambisonics and rendered binaurally using the aXMonitor. Every two seconds it switches between a correct rendering and one in which one of the B-format channels is delayed by only 0.1 ms (4.41 samples). Hardly a massive delay! With stereo it would barely be audible. With Ambisonics, it completely ruins the spatial impression – listen as the noise goes from fully to the left to splitting into two spatial distinct sounds.
Listen with headphones!
The practical point to be made here is that plugins that change phase (or level) have to have been designed carefully. Using multi-mono plugins will apply processing individually to each B-format channel and almost certainly ruin the spatial quality of your audio. The SSA Plugins aXCompressor, aXGate and aXEqualiser give you dynamic range processing and EQ that you can apply to B-format signals and preserve the spatial integrity of your audio.
So here are 5 things you need to know about Ambisonics before you get started. If you have more questions about setting up an Ambisonic project, leave a comment or get in touch. I’m always happy to answer questions to help you down the road to spatial audio and 3D sound.
Today I’m having April sale and putting a 50% discount on my Ambisonic panning and decoding plugins for Windows (VST) and MacOS (VST/AU): aXPanner and aXMonitor. This offer runs until the 30th April 2018.
The aXPanner converts mono and stereo signals to YouTube360 compatible AmbiX-format Ambisonics. The aXMonitor decodes these Ambisonic signals to two-channel stereo and binaural (3D audio over headphones) formats to allow easy monitoring. Together they form the essential signal chain for spatial audio and are a great way to get started with Ambisonics.
You can check out my short tutorial on getting started with a basic Ambisonics chain here.
The aXPanner and aXMonitor available for three levels of spatial resolution: first, third and seventh order Ambisonics. Higher orders increases the spatial fidelity of the sound scene.
This 50% discount can be combined with additional 20% bundle discounts for additional savings.
You can read more details about them in my web store :
The aXCompressor is a compressor VST plugin (Windows and Mac) made specifically for Ambisonics signals. It comes in three variations: first order (a1), third order (a3) and seventh order (a7), allowing you to process . They accept any Ambisonics format that has the W channel as the first channel. This means it works for the more modern AmbiX and legacy FuMa format.
There are plenty of Ambisonics encoders and decoders but not so many things to process between these two points on the signal chain. I wanted to help bring some of the tools we take for granted when working in stereo to VR/AR and immersive audio, hence the aX Plugins. If you’re interested in trying out any of the plugins, including the aXCompressor, you can download the demo versions. You can support future development by making a purchase at from my web shop. Continue reading Product Spotlight: aXCompressor
Today I am very happy to be releasing my latest work: the aX Ambisonics plugins. They are the result of a lot of work and it is great to be able to finally release them into the world.
The aX Plugins are a set of VST plugins intended to make your work with spatial and immersive audio that little bit easier. They come in three variations each with equivalent plugins – a1, a3 and a7.
Which one you choose will depend on the level of spatial resolution you need for your project (how accurately the spatial properties are reproduced to the final listener). The different levels are known in the Ambisonics world as the order and can theoretically go to infinity. In practice we can (thankfully!) stop somewhere quite a bit before infinity! The aX Plugins give you a choice between basic, advanced and future-proof version.
What are the plugins and what can they do?
There are currently seven plugins in each suite with a different purpose. Here is a quick summary:
aXPanner – a stereo to Ambisonics encoder to bring your sounds into the spatial domain.
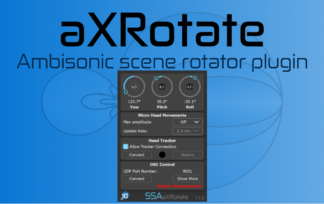
aXRotate – this plugin will let you rotate a single track or a full sound scene to make sure you have everything exactly where you want it.
aXMonitor – Ambisonics needs a decoder to be listened to. This plugin decodes to binaural 3D audio (over headphones) or to standard stereo. This means you can always share your creativity via traditional channels.
aXCompressor – Ambisonics requires careful handling of the audio to avoid changing the spatial balance. aXCompressor lets you compress the signal without alteration.
aXGate – simiarly, this plugin acts as a noise gate and downwards expander while preserving the spatial fidelity.
aXEqualizer – safely sculpt the tone of your signals.
aXDelay – get creative with five independent delay modules that can be rotated independently of the original signal.
I will be doing a series of posts going into more detail about each plugin. You can also get more information on the product pages. In the meantime, if you are curious, you can download demo versions of these plugins (for evaluation purposes only) here and if you like them you can support future development by buying them from the shop. Thanks!
Audio for VR/AR is getting a lot of attention these days, now that people are realising how essential good spatial audio is for an immersive experience. But we still don’t have as many tools as are available for stereo. Not even close!
This is because Ambisonics has to handled carefully when processing in order to keep the correct spatial effect – even a small phase change between channels significantly alter the spatial effect – so there are very few plugins that can be used after the sound has been encoded.
To avoid this problem we can apply effects and processing before spatial encoding, but then we are restricted in what we can do and how we can place it. It is also not an option if you are using an Ambisonics microphone (such as the SoundField, Tetra Mic or AMBEO VR), because it is already encoded! We need to be able to process Ambisonics channels directly without destroying the spatial effect.
So, what is missing from your 3D sound toolbox? Is there a plugin that you would reach for in stereo that doesn’t exist for spatial audio? Maybe you want to take advantage of the additional spatial dimensions but don’t have a tool to help you do that. Whatever you need, I am interested in hearing about it. I have a number of plugins that will be available soon that will fulfil some technical and creative requirements, but there can always be more! In fact, I’ve already released the first one for free. I am particularly interested in creative tools that would be applied after encoding but before decoding.
With that in mind, I am asking what you would like to see that doesn’t exist. If you are the first person to suggest an idea (either via the form or in the comments) and I am able to make it into a plugin then you’ll get a free copy! There is plenty of work to do to get spatial audio tools to the level of stereo but, with your help, I want to make a start.
We use cookies on our website to give you the most relevant experience by remembering your preferences and repeat visits. By clicking “Accept”, you consent to the use of ALL the cookies.
This website uses cookies to improve your experience while you navigate through the website. Out of these cookies, the cookies that are categorized as necessary are stored on your browser as they are essential for the working of basic functionalities of the website.
Necessary cookies are absolutely essential for the website to function properly. This category only includes cookies that ensures basic functionalities and security features of the website. These cookies do not store any personal information.
Any cookies that may not be particularly necessary for the website to function and is used specifically to collect user personal data via analytics, ads, other embedded contents are termed as non-necessary cookies. It is mandatory to procure user consent prior to running these cookies on your website.
Functional cookies help to perform certain functionalities like sharing the content of the website on social media platforms, collect feedbacks, and other third-party features.
Performance cookies are used to understand and analyze the key performance indexes of the website which helps in delivering a better user experience for the visitors.
Analytical cookies are used to understand how visitors interact with the website. These cookies help provide information on metrics the number of visitors, bounce rate, traffic source, etc.
Advertisement cookies are used to provide visitors with relevant ads and marketing campaigns. These cookies track visitors across websites and collect information to provide customized ads.